Ruby Simplified Part 4: Ruby Loops

Let’s look at some Ruby loop constructs: for, while, and until.

# .Each loop
x = 10
x.times do |i|        
    puts "#{i}"    # Starts at 0, ends at 9
end

# For loop
for i in 0..10 do  # Needs a range
    puts "#{i}"    # Starts at 0, ends at 10
end

# While loop
x = 0
while x < 10
    puts "#{x}"    # Starts at 0, ends at 9
    x += 1
end

# Until loop
x = 0
until x >= 10 do
    puts "#{x}"    # Starts at 0, ends at 9
    x += 1
end

Ruby also supports break and next, these are equivalent to break and continue in C#.

# Break
for i in 0..10
    if i > 5
        break      # Terminate the most internal loop
    end
    puts "#{i}"    # Will print 0 1 2 3 4 5
end

# Next
for i in 0..10
    if i < 5
        next
    end
    puts "#{i}"    # Will print 5 6 7 8 9 10
end

Ruby Simplified Part 3: Ruby conditional statements

Let’s look at some conditional statements in Ruby, if-else, case, and unless.

=begin
A simple program to test user input,
notice that this comment is multiline
=end

# If-Else statement
puts "Please input number..."
x = gets        # Get user input
x = x.chomp     # Chop off the '\n' at the end
x = x.to_i      # convert the string into an integer

if (x < 0) 
    puts "user input " + x.to_s + " is negative"    # convert integer into string with .to_s
elsif (x == 0)
    puts "user input " + x.to_s + " is zero"
else
    puts "user input " + x.to_s + " is positive"
end

# The 'if' modifier
puts "Writes this line only if x is 1" if x == 1

# Case statement
puts "Please input another number..."
x = gets.chomp.to_i     # Notice how we shorten the operations

case
    when x < 0 
        puts "user input " + x.to_s + " is negative" 
    when x == 0
        puts "user input " + x.to_s + " is zero"
    when x > 0
        puts "user input " + x.to_s + " is positive"
end

# Unless statement
puts "Please input another number..."
x = gets.chomp.to_i

unless x > 0        # The equivalent of 'unless' is the if(!...) in C#
    unless x == 0
        puts "user input " + x.to_s + " is negative"
    else
        puts "user input " + x.to_s + " is zero"
    end
else
    puts "user input " + x.to_s + " is positive"
end

# Unless conditional
puts "Write this line unless x is 0, meaning, if x is 0 then don’t write this line" unless x == 0

# Anything inside 'BEGIN' is called before the program is run
BEGIN { puts "Simple program to test user input." }

# Anything inside 'END' is called after the program is run
END { puts "All done!" }

Ruby Simplified Part 2: Major language features

Some features of the Ruby programming language, comparing them with C#,

1. Ruby is a dynamically typed programming language.
C# got dynamic extensions to the language in C# 4.0

2. Ruby is open source. Not only is it free of charge, but also free to use, copy, modify, and distribute.
C# is not open source, for an open source implementation of the ECMA standards for C#, see the Mono Project.

3. Ruby was designed as an interpreted language. The first Ruby interpreter (MRI) was written in C and was a single pass interpreter. The current official interpreter (YARV), however, compiles Ruby into something called ‘YARV Instruction Sequence’, which is then compiled just-in-time (JIT) to assembly language. There are several other implementations of Ruby (ex., JRuby, IronRuby, and MacRuby) which also compile the Ruby code in a two step process to machine language.
C# also has a two-step process, it’s first compiled into an intermediate language (IL) by the C# compiler and then JIT compiled to machine language by the CLR.

4. Ruby is a pure object oriented language. In Ruby everything is an object. You can append .class to anything to get the class name. Type puts 1.class (you’ll get ‘Fixnum’).
In C#, not everything is a object (numbers, structs, etc.)

5. Ruby has automatic memory management.
C# also has a full fledged garbage collector.

6. Ruby supports single inheritance only. Although we’ll see how to implement multiple inheritance using modules/mixins.
C# also supports single inheritance only. Multiple inheritance in C# is implemented using interfaces.

7. Ruby has modern exception handling features (using begin-rescue-ensure).
C# equivalent of this is the try-catch-finally blocks.

Ruby Simplified Part 1: Installing Ruby on Windows

Install the current version of Ruby using the Ruby Installer. During installing choose the options below, and finish the installation process.

image

Now if you go to the C:\Ruby folder, you’ll see,

image

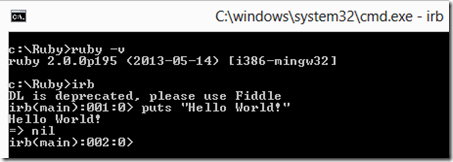
Open up a command prompt, and type ruby –v,

image

We’ve successfully installed the current version! To get help with more Ruby commands use ruby –h.

Now let’s try out “Hello World” in Ruby. Type ‘irb’ at the command prompt to get the Interactive Ruby Shell – it’s a command line for Ruby. Then use puts to output a string.

image

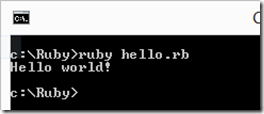
To run a ruby file, create a file ‘hello.rb’,

image

Now execute the file with ruby hello.rb,

image

Ruby Simplified Series

Ruby has become a very popular programming language because of it’s simplicity and productivity. In this series we’ll explore some of the syntax and features of the Ruby programming language.

Ruby Simplified Part 1: Installing Ruby on Windows

Ruby Simplified Part 2: Major language features

Powershell Simplified Part 9: Powershell Tips

Some Powershell tips and tricks to make your life easier,

1. Working with write-host,

write-host "starting "nonewline          # don't add a new line after the string
write-host "iexplore.exe" -foregroundcolor red -backgroundcolor yellow  # change text color
write-host "`nIs a new line`n"             # `n is a new line
write-host "`tIs a tab"                    # `t is a tab
write-host ("{0} : {1}" -f "formatting a string", "works!")    # format a string
write-host "this is a double-quote `""
write-host "this is a single-quote '" 

2. Powershell also has an equivalent of C#’s string literal, called here-string,

$a = @"
This can have any char: ``~!@#$%^&*()_+{}|\;'"<>?[]/     # note that ` needs to be escaped with another `
"@
write-host $a

3. To get the current script name,

write-host $MyInvocation.MyCommand.Name         # get current script name
write-host $MyInvocation.MyCommand.Definition   # get current script full directory 

4. Sometimes we need to suppress a Powershell cmd output,

$path = "c:\program files\internet explorer\signup\test"
new-item $path -itemtype directory              # will output some extra information to stdout

# to suppress the output, try one of these,
new-item $path -itemtype directory > $null      # preferred way
new-item $path -itemtype directory | out-null
$null = new-item $path -itemtype directory
[void] (new-item $path -itemtype directory)

5. Strings and variable/expression expansions,

$a = "test"
write-host 'this is a $a'            # single-quote won't expand the variable
write-host "this is a $a"            # only double-quotes will process variable substitutions 

$file = get-item $env:windir\explorer.exe
write-host "file version: $file.versioninfo.productversion"        # variables get expanded in strings not property expressions
write-host "file version: $($file.versioninfo.productversion)"     # use $() for expression expansion 

6. Getting keyboard input,

write-host "Press any key to continue ..."
$x = $host.UI.RawUI.ReadKey("NoEcho, IncludeKeyDown") 
write-host "Pressed $($x.character)"
switch($x.virtualkeycode) {           # for special keys, map the virtualkeycode,
    13 { write-host "Enter" } 
    16 { write-host "Shift" } 
}

7. We can add custom C# types to Powershell using add-type. However add-type has a limitation that once you load an assembly into a .NET application, the types it contains are not released until the application shuts down, so running the sample below again will result in “Add-Type : Cannot add type. The type name ‘myClass’ already exists.

add-type -typedefinition @" 
  using System;
  public class myClass { 
      private string _test = "He said: "; 
      private static string test = "She said: ";

      public string Test { 
          get { return this._test; } 
          set { this._test = value; } 
      } 

      public string DoSomething(string str) { 
          return this.Test + str; 
      }

      public static string DoSomethingElse(string str) { 
          return test + str; 
      }
  } 
"@ 

[myClass]::DoSomethingElse("test")   # invoke the static method
$a = new-object myClass
$a.DoSomething("test")               # invoke the instance method

Powershell Simplified Part 8: Accessing the File System

With Powershell you can manipulate the file system easily,

$path = "c:\program files\internet explorer"

# get all the files in a folder and subfolders
$dlls = get-childitem $path -recurse

# filter based on file extension
$dlls = get-childitem $path -filter *.dll -recurse

# count the total number of files
$count = (get-childitem $path -filter *.dll -recurse).count

# for multiple filders use 'include' and 'exclude'
$dlls = get-childitem $path -include *.dll, *.exe -recurse

# filder based on other criteria
$dlls = get-childitem $path -filter *.dll -recurse | where-object { $_.length -gt 150KB }

foreach ($dll in $dlls) { write-host $dll }

Use the PSIsContainer to determine if a directory item is a file or a subdirectory.

# find subdirs only
$dirs = get-childitem $path -recurse | where-object { $_.PSIsContainer }

# find files only
$files = get-childitem $path -recurse | where-object { $_.PSIsContainer -eq $false}

We can get detailed information about a file,

get-item $env:windir\explorer.exe | select-object *   # view individual file properties
$file = get-item $env:windir\explorer.exe             # get individual file properties
write-host $file.versioninfo.productversion

Now let’s do some basic file/folder operations,

$path = "c:\program files\internet explorer\signup\test"

# check if a directory exists 
if (-not (test-path $path)) { write-host "Invalid path" }

# create a directory
new-item $path -itemtype directory

# create a file
$filepath = [System.IO.Path]::Combine($path, "test.txt")
new-item $filepath -itemtype file

# write to the file
add-content $filepath "<root>"
add-content $filepath "</root>"

# read the file contents
$content = get-content $filepath
write-host $content

# rename the file
rename-item $filepath "test.xml"

# change a file property
$filepath = [System.IO.Path]::Combine($path, "test.xml")
$file = get-item $filepath
$file.isreadonly = $true         # change to read-only

# delete a file
remove-item $filepath –force     # use 'force' for write-protected files 

# delete a directory
remove-item $path\* –recurse     # delete all files and subdirectories
remove-item $path -recurse       # delete the directory and all files and subdirectories

Powershell Simplified Part 7: Error Handling

Exception handling in Powershell is primarily based on try-catch-finally and trap. Let’s see some scenarios,

function throws-error { throw "an error occured here" }
throws-error        # unhandled exception - script will error out

If we want to catch an error, we can use the try-catch construct,

function throws-error {
    # we can throw a .NET exception too
    throw [System.IO.FileNotFoundException] "throwing a filenotfoundexception"
}

try { throws-error }
catch {
    # let's get some more information about the error
    write-host $_
    $_.GetType().FullName              # the type of $_ is 'System.Management.Automation.ErrorRecord'
    $_.Exception
    $_.Exception.GetType().FullName    # the exception type name is 'System.IO.FileNotFoundException'
    $_.Exception.Message               # the exception message 
}

Just like in C#, we can catch different types of exceptions with a single try. Order is important, catch the most specific exceptions first.

function throw-errors([int]$errorType) {
    switch ($errorType) {
        1 { throw [System.IO.FileNotFoundException] "throwing a filenotfoundexception" }
        2 { throw [System.IO.IOException]  "throwing a ioexception" }
        3 { throw [System.SystemException]  "throwing a systemexception" }
        default { throw [System.Exception] "a default error" }
    }
}

try { throw-errors 2 }
catch [System.IO.FileNotFoundException] { "caught filenotfoundexception" }    # catch the most specific exception first
catch [System.IO.IOException] { "caught ioexception" }
catch [System.SystemException] { "caught systemexception" } 
catch [System.Exception] { "caught exception" }                               # catch the most generic exception last
finally { "done" }

Every pre-defined Powershell cmdlet comes with built-in error handling via a common parameter called –ErrorAction. To see this is action try the commands below,

get-process –fileversion                                # you'll get a few errors in the output
get-process -fileversion -erroraction silentlycontinue  # ignore the errors
get-process -fileversion -ea 0                          # 'ea' is the alias for erroraction
get-process -fileversion -errorvariable errors          # get an array of errors that occured
write-host $errors.count                                # how many errors occured?
foreach ($error in $errors) { write-host "Error:" $error }

If you want to import the common parameters into your function then use the CmdletBinding.

function throws-error {
    [CmdletBinding()]              # our function now supports the ErrorAction param implicitly
    param()

    throw "an error occured here"
}

function throws-error2 {
    # ErrorAction actually sets the $ErrorActionPreference, and we can do this ourselves
    $ErrorActionPreference = "silentlycontinue" 

    throw "an error occured here"
}

throws-error -ea 0    # no error is thrown
throws-error2         # no error is thrown

Now let’s look at the other Powershell way of handling exceptions – trap. Traps handle the exception and allow script execution to continue.

trap [IO.FileNotFoundException] { "trapped outside " + $_.Exception; continue; }

function test-trap {
    # break results in re-throwing the exception, so it can be handled by the outer trap
    trap [IO.FileNotFoundException] { "trapped inside " + $_.Exception; break; }

    throw [IO.FileNotFoundException] "a filenotfoundexception"
    "will not output this line"
}

test-trap

The ‘will not output this line’ doesn’t get output because with ‘continue’, execution is returned to the scope the trap is in and the next command is executed. To see this more clearly,

function test-trap {
   trap { "outer " + $_.Exception; continue; }

   if($true) {
        trap { "inner " + $_.Exception; break; }

        throw "an error occured";
        "will not output this line"
   }

   "will output this line"
}

test-trap

We can also trap multiple exceptions, like catch blocks,

function test-trap {   
    throw [IO.FileNotFoundException] "a filenotfoundexception"
    throw (new-object IO.IOException("an ioexception"))        # this is executed because of the 'continue' in the filenotfoundexception trap
    throw (new-object SystemException("a systemexception"))    # note the different way throwing
    throw [Exception] "a default error"

    # order of traps not important
    trap [SystemException]           { $_.Exception; continue; }        # 'continue' execute the next command in the scope of the 'trap'
    trap [IO.FileNotFoundException]  { $_.Exception; continue; }        # 'continue' causes the throw ioexception statement to execute
    trap [Exception]                 { $_.Exception; continue; }
    trap [IO.IOException]            { $_.Exception; continue; }
    
    "done"
}

test-trap

As you can see, using traps are a little tricky, using try-catch should cover most (if not all) your cases.

Powershell Simplified Part 6: Functions

Functions in Powershell scripts work just like you’d expect.

# define a function
function get-capital($country) {
    $htable = @{UK = "London"; Austria = "Vienna"; France = "Paris"}
    if ($htable.ContainsKey($country)) { return $htable[$country] }
    else { return "Not found" }
}

# call the function
$capital = get-capital("Austria")
write-host $capital

One interesting thing about Powershell functions is that anything you ‘leave behind’ will be automatically assigned as return value. If you leave behind more than one piece of information, it will be returned as an array. Thus we can get rid of the ‘return‘ keyword, but it’s much more readable to use it.

# define a function
function get-capital($country) {
    $htable = @{UK = "London"; Austria = "Vienna"; France = "Paris"}
    if ($htable.ContainsKey($country)) { $htable[$country] }
    else { "Not found" }
}

Adding function parameters is use for making sure your function is called with the right params.

function get-capital {
    param (
        [ValidateSet("prod","ppe","dev")]           # must be a value from this set
        [parameter(Mandatory=$false, position=0)]   # assign a position so that arguments can be passed without a parameter name
        [alias("env")]                              # alias for this param
        [string]                                    # param type is string
        $environment = "dev",                       # use a default value if none specified

        [ValidateRange(1,99)]
        [parameter(Mandatory=$true, position=1)]    # note no alias specified
        [string]
        $country,

        [ValidateSet("UK","Austria","France")]      # also see ValidateScript and ValidatePattern
        [parameter(Mandatory=$false, position=2)]   # This param is optional
        [alias("i")]
        [int]
        $id = 42
    )

    $htable = @{UK = "London"; Austria = "Vienna"; France = "Paris"}
    if ($htable.ContainsKey($country)) { return $htable[$country] }
    else { return "Not found" }
}

# different ways to invoke the function
$capital = get-capital -country "France"
$capital = get-capital -env "prod" -country "France"
$capital = get-capital -env "prod" -country "France" -i 9
$capital = get-capital "prod" "France" 9

For more advanced parameter options see here. Let’s take a look at two more advanced parameter options: switch and pipeline-aware.

function get-capital { param ( # receive incoming pipeline input and bind to this arg [parameter(Mandatory=$true, ValueFromPipeline=$true)] [string] $env, # switch parameters do not take arguments – they are either present or not [switch] $flag ) # check for the presence of ‘flag’ in the param list if ($flag) { write-host “has flag” } else { write-host “no flag” } write-host $env } get-capital -env “Prod” # ‘flag’ is optional get-capital -env “Prod” –flag # using the ‘flag’ param (no param) “PPE” | get-capital # pipe the string value to the function which binds it to $env


Powershell Simplified Part 5: Services and EventLogs

Working with Windows services is easy with Powershell.

get-service                    # list of all services
get-service netlogon           # service details
stop-service netlogon -force   # stop a service
start-service netlogon         # start a service

# to view other service related commands use: get-command *-service

Powershell allows manipulating services via WMI too, which we’ll see in another post. Working with the eventlog is also easy.

# get a particular log then filter by source
get-eventLog -logname "Ijv.Platform" -source "Service Control Manager"
# register an event source 'myscript'
new-eventlog -logname application -source myScript 
# write to the eventlog
write-eventlog -logname application -source myScript -entrytype information -eventid 123 -message 'Test event log entry'
get-eventlog -logname application -newest 10         # get top 10 entries