Azure Simplified Part 5: Using REST API for Azure Queue Storage

Up until now we were looking at how to use the Azure storage with Azure Managed API. Windows Azure also provides REST API to interact with Azure storage. The managed API is actually a wrapper around the the REST API. Today we’ll use the REST API to put/get a message from the queue.

1. Start the Azure queue we built here. The reason we are doing this is because we’ll use the managed API to create a queue called ‘myqueue’, and we’ll use the REST API to post and get messages from this queue. You can obviously also create a queue using the REST API.

2. Open Visual Studio 2008 and create a WPF application. For the XAML use this,

<Grid>
    <Grid.RowDefinitions>
        <RowDefinition Height="30" />
        <RowDefinition Height="Auto" />
    </Grid.RowDefinitions>
    <Grid.ColumnDefinitions>
        <ColumnDefinition />
        <ColumnDefinition />
    </Grid.ColumnDefinitions>
    
    <TextBox x:Name="PostMsg" />
    <Button Grid.Column="1" Height="25" Width="80" Content="Post Message" Click="PostButtonClick" />

    <Button Grid.Row="1" Height="25" Width="80" Content="Get Message" Click="GetButtonClick" />
    <TextBlock Grid.Column="1" Grid.Row="1" Height="Auto" TextWrapping="Wrap" x:Name="GetMsg" />
</Grid>

3. For the code behind, the method to post a message to the queue,

// For the Queue REST API URI syntax
// (see http://msdn.microsoft.com/en-us/library/dd179409.aspx)
private void PostButtonClick(object sender, RoutedEventArgs e)
{
    // The URI path is the same as what we had in
    // https://soumya.wordpress.com/2010/05/20/azure-simplified-part-4-using-azure-queue-storage/
    HttpWebRequest request = (HttpWebRequest)HttpWebRequest.Create("http://127.0.0.1:10001/devstoreaccount1/myqueue/messages");

    // Set request timeouts
    request.Timeout = (int)TimeSpan.FromSeconds(30).TotalMilliseconds;
    request.ReadWriteTimeout = request.Timeout;
    
    // POST because we want to put a message onto the queue
    // (see http://msdn.microsoft.com/en-us/library/dd179346(v=MSDN.10).aspx)
    request.Method = "POST";

    // Always have to use UTC date/time
    request.Headers.Add("x-ms-date", DateTime.UtcNow.ToString("R", CultureInfo.InvariantCulture));

    // NOTE: The message posted to the queue MUST be base64 encoded!
    string postMessage = this.PostMsg.Text;
    System.Text.ASCIIEncoding enc = new System.Text.ASCIIEncoding();
    byte[] postMessageByteArray = enc.GetBytes(postMessage);
    string postMessageBase64 = System.Convert.ToBase64String(postMessageByteArray);

    // Create the message that we'll POST to the queue
    // (see http://msdn.microsoft.com/en-us/library/dd179346(v=MSDN.10).aspx)
    byte[] baMessage = enc.GetBytes("<QueueMessage><MessageText>" + postMessageBase64 + "</MessageText></QueueMessage>");

    // Set the request content length and content type
    request.ContentLength = baMessage.Length;
    request.ContentType = "text/plain; charset=UTF-8";

    // Create the string that will be signed
    // (see http://msdn.microsoft.com/en-us/library/dd179428.aspx)
    string stringToSign = request.Method + "\n" +
        String.Empty + "\n" +
        request.ContentType + "\n" +
        String.Empty + "\n" +
        "x-ms-date:" + request.Headers["x-ms-date"] + "\n" +
        "/" + "devstoreaccount1" + "/devstoreaccount1/myqueue/messages";

    // The account key for development storage is the same for everybody
    // (see http://msdn.microsoft.com/en-us/library/dd179339.aspx)
    string accountKey = "Eby8vdM02xNOcqFlqUwJPLlmEtlCDXJ1OUzFT50uSRZ6IFsuFq2UVErCz4I6tq/K1SZFPTOtr/KBHBeksoGMGw==";

    // Sign the request
    var hmac = new HMACSHA256(Convert.FromBase64String(accountKey));
    request.Headers["Authorization"] = "SharedKey " + "devstoreaccount1" + ":" 
                                        + Convert.ToBase64String(hmac.ComputeHash(Encoding.UTF8.GetBytes(stringToSign)));

    // Send the request to the queue
    try {
        using (Stream requestStream = request.GetRequestStream()) {
            requestStream.Write(baMessage, 0, baMessage.Length);
            requestStream.Close();
            using (HttpWebResponse response = (HttpWebResponse)request.GetResponse()) {
                // Check that (response.StatusCode == HttpStatusCode.Created)
                response.Close();
            }
        }
    }
    catch (WebException ex) { MessageBox.Show(ex.Message); }
}

4. And the method to get a message from the queue, is similar,

// For the Queue REST API URI syntax
// (see http://msdn.microsoft.com/en-us/library/dd179409.aspx)
private void GetButtonClick(object sender, RoutedEventArgs e)
{
    // The URI path is the same as what we had in
    // https://soumya.wordpress.com/2010/05/20/azure-simplified-part-4-using-azure-queue-storage/
    HttpWebRequest request = (HttpWebRequest)HttpWebRequest.Create("http://127.0.0.1:10001/devstoreaccount1/myqueue/messages");

    // Set request timeouts
    request.Timeout = (int)TimeSpan.FromSeconds(30).TotalMilliseconds;
    request.ReadWriteTimeout = request.Timeout;

    // GET because we want to get a message from the queue
    // (see http://msdn.microsoft.com/en-us/library/dd179474(v=MSDN.10).aspx)
    request.Method = "GET";

    // Always have to use UTC date/time
    request.Headers.Add("x-ms-date", DateTime.UtcNow.ToString("R", CultureInfo.InvariantCulture));

    // Set the request content length and content type
    request.ContentLength = 0;
    request.ContentType = "text/plain; charset=UTF-8";

    // Create the string that will be signed
    // (see http://msdn.microsoft.com/en-us/library/dd179428.aspx)
    string stringToSign = request.Method + "\n" +
        String.Empty + "\n" +
        request.ContentType + "\n" +
        String.Empty + "\n" +
        "x-ms-date:" + request.Headers["x-ms-date"] + "\n" +
        "/" + "devstoreaccount1" + "/devstoreaccount1/myqueue/messages";

    // The account key for development storage is the same for everybody
    // (see http://msdn.microsoft.com/en-us/library/dd179339.aspx)
    string accountKey = "Eby8vdM02xNOcqFlqUwJPLlmEtlCDXJ1OUzFT50uSRZ6IFsuFq2UVErCz4I6tq/K1SZFPTOtr/KBHBeksoGMGw==";

    // Sign the request
    var hmac = new HMACSHA256(Convert.FromBase64String(accountKey));
    request.Headers["Authorization"] = "SharedKey " + "devstoreaccount1" + ":"
                                        + Convert.ToBase64String(hmac.ComputeHash(Encoding.UTF8.GetBytes(stringToSign)));

    // Send the request to the queue
    try {
        using (HttpWebResponse response = (HttpWebResponse)request.GetResponse()) {
            if (response.StatusCode == HttpStatusCode.OK) {
                using (Stream stream = response.GetResponseStream()) {
                    XmlDocument doc = new XmlDocument();
                    doc.Load(stream);
                    this.GetMsg.Text = doc.InnerXml;
                    stream.Close();
                    response.Close();
                }
            }
        }
    }
    catch (WebException ex) { MessageBox.Show(ex.Message); }
}

5. Now make sure you run the sample in Step 1 first. That will ensure that you have a queue called ‘myqueue’ in the development storage. Running this app now, you should see something like this,

image

Remember the message is base64 encoded, which is why you see gibberish between the MessageText tags.

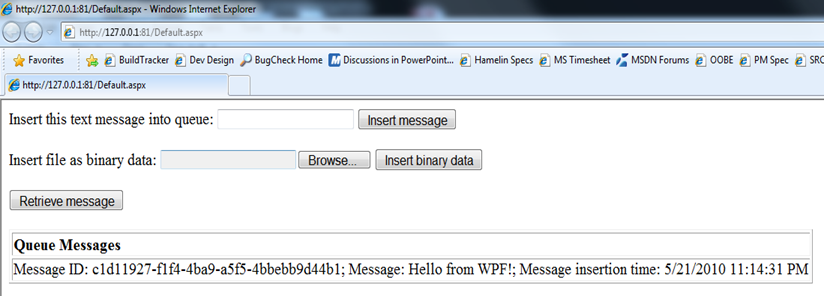
6. Now you can post a message from the WPF app (using REST API) and see the message from the ASP.NET WebRole  app (using the managed API). Just refresh the webpage that opened when you ran the code in Step 1, (the managed API converts from base64),

image

Digg This

Azure Simplified Part 4: Using Azure Queue Storage

We’ve seen Azure table and blob storage, let’s look at queue storage today. The first four steps are the same as before,

1. Open up VisualStudio 2008 (run as Administrator) and create a new ‘Cloud Service’ project,

image

2. Create an ASP.NET WebRole,

image

3. Add a new data connection string. To do this, go to CloudService1 –> Roles –> WebRole1 –> right click Properties –> Settings –> Add Setting. Type in ‘DataConnectionString’ and change the Type column to ‘Connection String’. Then click on the ‘…’ at the far right and choose ‘Use development storage’.

image 

4. Nasty hack alert! Add the following code to the WebRole.cs’s OnStart method,

public override bool OnStart() {
    DiagnosticMonitor.Start("DiagnosticsConnectionString");

    // For information on handling configuration changes
    // see the MSDN topic at http://go.microsoft.com/fwlink/?LinkId=166357.
    RoleEnvironment.Changing += RoleEnvironmentChanging;

    // This code sets up a handler to update CloudStorageAccount instances when their corresponding
    // configuration settings change in the service configuration file.
    CloudStorageAccount.SetConfigurationSettingPublisher((configName, configSetter) => {
        // Provide the configSetter with the initial value
        configSetter(RoleEnvironment.GetConfigurationSettingValue(configName));

        RoleEnvironment.Changed += (sender, arg) => {
            if (arg.Changes.OfType<RoleEnvironmentConfigurationSettingChange>()
                .Any((change) => (change.ConfigurationSettingName == configName))) {
                    // The corresponding configuration setting has changed, propagate the value
                    if (!configSetter(RoleEnvironment.GetConfigurationSettingValue(configName))) {
                        RoleEnvironment.RequestRecycle();
                    }
            }
        };
    });
    return base.OnStart();
}


5. Now add the following HTML to the Default.aspx file,

<body>
    <form id="form1" runat="server">
        <div>
            <asp:Label id="Label1" Text="Insert this text message into queue:" runat="server" />
            <asp:TextBox id="TextBox1" runat="server" />   
            <asp:Button ID="Button1" Text="Insert message" runat="server" />
            <br />
            <br />
            <asp:Label id="Label2" Text="Insert file as binary data:" runat="server" />
            <asp:FileUpload ID="fileUploadControl" runat="server" />
            <asp:Button ID="Button2" Text="Insert binary data" runat="server" />
            <br />
            <br />
            <asp:Button ID="Button3" Text="Retrieve message" runat="server" />
            <asp:Label id="Label3" runat="server" />
            <br />
            <br />
            <asp:Repeater id="Repeater1" runat="server">
                <HeaderTemplate>
                    <table border="1">
                        <tr><td><b>Queue Messages</b></td></tr>
                </HeaderTemplate>
                <ItemTemplate>
                    <tr>
                      <td> <asp:Label runat="server" Text="<%# Container.DataItem %>" /> </td>
                    </tr>
                </ItemTemplate>
                <FooterTemplate>
                    </table>
                </FooterTemplate>
            </asp:Repeater>
        </div>    
    </form>
</body>


6. Add the following code to the Default.aspx.cs file,

public partial class _Default : System.Web.UI.Page {
    // Manage account information
    CloudStorageAccount storageAccount = null;

    // Cloud queue
    CloudQueue cloudQueue = null;

    // Cloud client
    CloudQueueClient queueClient = null;

    protected void Page_Load(object sender, EventArgs e) {
        // Init the contexts
        this.storageAccount = CloudStorageAccount.FromConfigurationSetting("DataConnectionString");
        this.queueClient = storageAccount.CreateCloudQueueClient();

        // Get and create the container
        this.cloudQueue = this.queueClient.GetQueueReference("myqueue");
        this.cloudQueue.CreateIfNotExist();

        // Hook up the buttons
        this.Button1.Click += new EventHandler(InsertTextMessage);
        this.Button2.Click += new EventHandler(InsertByteArrayMessage);
        this.Button3.Click += new EventHandler(RetrieveMessage);

        this.DisplayMesssages();
    }

    // Simulate a consumer of messages: Retrieve a message from the queue and process it
    private void RetrieveMessage(object sender, EventArgs e) {
        // Get a single message from the queue
        // We can also get multiple messages using GetMessages
        CloudQueueMessage msg = this.cloudQueue.GetMessage();
        this.Label3.Text = "Retrieved message: " + msg.AsString;

        // Done processing the message, delete the message from the queue
        this.cloudQueue.DeleteMessage(msg);

        this.DisplayMesssages();
    }

    // Simulate a producer of messages: Insert text message into queue
    private void InsertTextMessage(object sender, EventArgs e) {
        CloudQueueMessage msg = new CloudQueueMessage(this.TextBox1.Text);
        this.cloudQueue.AddMessage(msg);

        this.DisplayMesssages();
    }

    // Simulate a producer of messages: Insert binary message into queue
    private void InsertByteArrayMessage(object sender, EventArgs e) {
        // The file size needs to be less than 8KB
        // NOTE: Place the file in the following folder, else file read will fail,
        // [ProjectPath]\CloudService1\CloudService1\bin\Debug\CloudService1.csx\roles\WebRole1
        CloudQueueMessage msg = new CloudQueueMessage(File.ReadAllBytes(fileUploadControl.FileName));
        this.cloudQueue.AddMessage(msg);

        this.DisplayMesssages();
    }

    // Peek into the queue for messages
    private void DisplayMesssages() {
        // Get the first 5 messages in the queue, but don’t remove them
        var msgs = this.cloudQueue.PeekMessages(5);
        var cloudList = new List<string>();

        foreach (var msg in msgs) {
            cloudList.Add("Message ID: " + msg.Id + "; Message: " + msg.AsString + "; Message insertion time: " + msg.InsertionTime);
        }

        // Bind the repeater
        this.Repeater1.DataSource = cloudList;
        this.Repeater1.DataBind();
    }
}


7. Running the app you should get,

image

The Azure queue is a FIFO queue, so when you peek/get a message, it returns the first message (earliest message by time) that was inserted into the queue, problem is this is not guaranteed, so you need to carefully plan your application.

There is also the idea of message visibility, when a consumer pulls a message from the queue using GetMessage(), a few things happen,

1. The consumer notifies the queue that it wants a time of (the default) 30 seconds to process the message (and finally delete it from the queue). This can be changed by the consumer using the GetMessage(TimeSpan visibilityTimout) overload.

2. The queue gives the consumer a unique ‘popreceipt’ string (to track the most recent requester of this particular message) for the GetMessage operation, stores this ‘popreceipt’ id, and marks the message as invisible to other consumers for the duration of the what the consumer wants.

So when a new consumer requests a message, the next available visible message is sent to it. In case a consumer asks for a 30sec processing time, but fails to delete the message during this time, the message is marked visible again by the queue and is made available to the next consumer. If the consumer tries to delete a message after the timeout, the queue checks the ‘popreceipt’ to see if it indeed is the most recent requester of the message, if not an exception is thrown.

Azure Simplified Part 3: Using Azure Blob Storage

We’ll take a look at Azure’s Blob storage today. A Blob can store either text for binary data. Within your storage account, you can have multiple containers and each container can have multiple blobs. There are two type of blobs: block blobs optimized for streaming and page blobs optimized for read/write. Let’s make a sample application,

1. Open up VisualStudio 2008 (run as Administrator) and create a new ‘Cloud Service’ project,

image

2. Create an ASP.NET WebRole,

image

3. Add a new data connection string. To do this, go to CloudService1 –> Roles –> WebRole1 –> right click Properties –> Settings –> Add Setting. Type in ‘DataConnectionString’ and change the Type column to ‘Connection String’. Then click on the ‘…’ at the far right and choose ‘Use development storage’.

image 

4. Nasty hack alert! Add the following code to the WebRole.cs’s OnStart method,

public override bool OnStart() {
    DiagnosticMonitor.Start("DiagnosticsConnectionString");

    // For information on handling configuration changes
    // see the MSDN topic at http://go.microsoft.com/fwlink/?LinkId=166357.
    RoleEnvironment.Changing += RoleEnvironmentChanging;

    // This code sets up a handler to update CloudStorageAccount instances when their corresponding
    // configuration settings change in the service configuration file.
    CloudStorageAccount.SetConfigurationSettingPublisher((configName, configSetter) => {
        // Provide the configSetter with the initial value
        configSetter(RoleEnvironment.GetConfigurationSettingValue(configName));

        RoleEnvironment.Changed += (sender, arg) => {
            if (arg.Changes.OfType<RoleEnvironmentConfigurationSettingChange>()
                .Any((change) => (change.ConfigurationSettingName == configName))) {
                    // The corresponding configuration setting has changed, propagate the value
                    if (!configSetter(RoleEnvironment.GetConfigurationSettingValue(configName))) {
                        RoleEnvironment.RequestRecycle();
                    }
            }
        };
    });
    return base.OnStart();
}
 

5. Add the following HTML to the Default.aspx file,

<body>
    <form id="form1" runat="server">
        <div>
            <asp:Label id="Label1" Text="Insert this text as blob:" runat="server" />
            <asp:TextBox id="TextBox1" runat="server" />   
            <asp:Button ID="Button1" Text="Insert text blob" runat="server" />
            <br />
            <br />
            <asp:Label id="Label2" Text="Insert file as binary data:" runat="server" />
            <asp:FileUpload ID="fileUploadControl" runat="server" />
            <asp:Button ID="Button2" Text="Insert binary data" runat="server" />
            <br />
            <br />
            <asp:Label id="Label3" Text="Delete this blob (uri):" runat="server" />
            <asp:TextBox id="TextBox2" runat="server" />   
            <asp:Button ID="Button3" Text="Delete blob" runat="server" />
            <br />
            <br />
            <asp:Repeater id="Repeater1" runat="server">
                <HeaderTemplate>
                    <table border="1">
                        <tr><td><b>Blob Uri</b></td></tr>
                </HeaderTemplate>
                <ItemTemplate>
                    <tr>
                      <td> <asp:HyperLink runat="server" Text="<%# Container.DataItem %>" NavigateUrl="<%# Container.DataItem %>" /> </td>
                    </tr>
                </ItemTemplate>
                <FooterTemplate>
                    </table>
                </FooterTemplate>
            </asp:Repeater>
        </div>    
    </form>
</body>


6. Add the following code to the Default.aspx.cs file,

public partial class _Default : System.Web.UI.Page {
    // Manage account information
    CloudStorageAccount storageAccount = null;

    // Blob container
    CloudBlobContainer blobContainer = null;

    // Blob client
    CloudBlobClient blobClient = null;

    protected void Page_Load(object sender, EventArgs e) {
        // Init the contexts
        this.storageAccount = CloudStorageAccount.FromConfigurationSetting("DataConnectionString");
        this.blobClient = storageAccount.CreateCloudBlobClient();

        // Get and create the container
        this.blobContainer = this.blobClient.GetContainerReference("publicfiles");
        this.blobContainer.CreateIfNotExist();

        // Hook up the buttons
        this.Button1.Click += new EventHandler(InsertTextBlob);
        this.Button2.Click += new EventHandler(InsertBinaryBlob);
        this.Button3.Click += new EventHandler(DeleteBlob);

        this.DisplayBlobs();
    }

    // Delete a blob using the uri as key
    private void DeleteBlob(object sender, EventArgs e)
    {
        var blob = this.blobContainer.GetBlobReference(this.TextBox2.Text);
        blob.DeleteIfExists();

        this.DisplayBlobs();
    }

    // Insert a blob of text
    private void InsertTextBlob(object sender, EventArgs e)
    {
        CloudBlob blob = this.blobContainer.GetBlobReference(Guid.NewGuid().ToString());
        blob.UploadText(this.TextBox1.Text);

        this.DisplayBlobs();
    }

    // Insert binary data
    private void InsertBinaryBlob(object sender, EventArgs e) {

        // Adding the extension helps the browser use the right application to open the blob
        string extension = System.IO.Path.GetExtension(fileUploadControl.FileName);
        CloudBlob blob = this.blobContainer.GetBlobReference(Guid.NewGuid().ToString() + extension);
        blob.UploadFromStream(fileUploadControl.FileContent);

        this.DisplayBlobs();
    }

    // Display all blobs in the current container
    private void DisplayBlobs() {
        // Get a list of the blobs
        var blobs = this.blobContainer.ListBlobs();
        var blobList = new List<string>();

        foreach (var blob in blobs) {
            var cloudBlob = this.blobContainer.GetBlobReference(blob.Uri.ToString());
            cloudBlob.FetchAttributes();

            blobList.Add(blob.Uri.ToString());
        }

        // Bind to the repeater
        this.Repeater1.DataSource = blobList;
        this.Repeater1.DataBind();
    }
}

The code is simple, create a BlobClient and a container, and then upload data using UploadText or UploadFromStream (there are other methods like UploadFile too). The blobs are identified using the unique Uri assigned to them.


7. Running the app you should get,

image

Clicking on the URIs will open the text blob in the browser, and try to download the binary data.

Azure Simplified Part 2: Using Azure Tables

Now that we’ve built a “Hello Azure!” application, lets try using Azure tables…

1. Open up VisualStudio 2008 (run as Administrator) and create a new ‘Cloud Service’ project,

image

2. Create an ASP.NET WebRole,

image

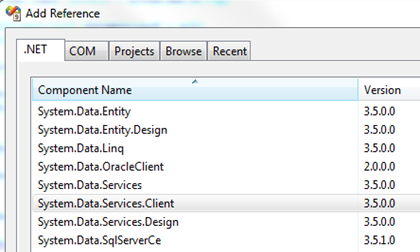
3. Add a reference to System.Data.Services.Client to the WebRole1 project.

image 

4. Add a new data connection string. To do this, go to CloudService1 –> Roles –> WebRole1 –> right click Properties –> Settings –> Add Setting. Type in ‘DataConnectionString’ and change the Type column to ‘Connection String’. Then click on the ‘…’ at the far right and choose ‘Use development storage’.

image 


5. Nasty hack alert! Add the following code to the WebRole.cs’s OnStart method,

public override bool OnStart() {
    DiagnosticMonitor.Start("DiagnosticsConnectionString");

    // For information on handling configuration changes
    // see the MSDN topic at http://go.microsoft.com/fwlink/?LinkId=166357.
    RoleEnvironment.Changing += RoleEnvironmentChanging;

    // This code sets up a handler to update CloudStorageAccount instances when their corresponding
    // configuration settings change in the service configuration file.
    CloudStorageAccount.SetConfigurationSettingPublisher((configName, configSetter) => 
    {
        // Provide the configSetter with the initial value
        configSetter(RoleEnvironment.GetConfigurationSettingValue(configName));

        RoleEnvironment.Changed += (sender, arg) =>
        {
            if (arg.Changes.OfType<RoleEnvironmentConfigurationSettingChange>()
                .Any((change) => (change.ConfigurationSettingName == configName))) {
                // The corresponding configuration setting has changed, propagate the value
                if (!configSetter(RoleEnvironment.GetConfigurationSettingValue(configName))) {
                    RoleEnvironment.RequestRecycle();
                }
            }
        };
    });

    return base.OnStart();
}
 

6. Whew! OK, now we are ready to add our custom code,The first class you need to create is how your table rows will look like. Add a class called ‘MyTableRow.cs’ to the WebRole1 project that contains,

using Microsoft.WindowsAzure.StorageClient;

namespace WebRole1 {
    public class MyTableRow : TableServiceEntity {
        public MyTableRow(string partitionKey, string rowKey) : base(partitionKey, rowKey) { }

        // Rows need a unique partition key – so create a new guid for every row
        public MyTableRow() : this(Guid.NewGuid().ToString(), String.Empty) { }

        // My table row
        public string Name { get; set; }
        public int Age { get; set; }
    }
}

7. Next open up Default.aspx and paste the following simple HTML controls to display the tables,

<body>
    <form id="form1" runat="server">
        <div>
            <asp:Label id="Label1" Text="Table name:" runat="server" />
            <asp:TextBox id="tablenameBox" runat="server" />
            <asp:Button ID="Button1" Text="Create Table" runat="server" />
            <br /><br />
            
            <!-- Display tables -->
            <asp:ListBox id="ListBox1" runat="server" Width="200" Height="100" />
            
            <asp:Button ID="Button3" Text="Delete Table" runat="server" />
            <br /><br />
            <asp:Label id="Label2" Text="Name:" runat="server" />
            <asp:TextBox id="rowName" runat="server" />   
            <asp:Label id="Label3" Text="Age:" runat="server" />
            <asp:TextBox id="rowAge" runat="server" />   
            <asp:Button ID="Button2" Text="Insert into Table" runat="server" />
            <br /><br />
            
            <!-- Display table contents -->
            <asp:Repeater id="Repeater1" runat="server">
                <HeaderTemplate>
                    <table border="1">
                        <tr><td><b>Name</b></td><td><b>Age</b></td></tr>
                </HeaderTemplate>
                <ItemTemplate>
                    <tr>
                      <td> <%# DataBinder.Eval(Container.DataItem, "Name") %> </td>
                      <td> <%# DataBinder.Eval(Container.DataItem, "Age") %> </td>
                    </tr>
                </ItemTemplate>
                <FooterTemplate>
                    </table>
                </FooterTemplate>
            </asp:Repeater>
        </div>    
    </form>
</body>
 

As you see, there’s nothing fancy in the HTML,  just a few buttons, a listbox to display the tables and a Repeater control to display the table contents.

7. Open Default.aspx.cs and insert the code, (you’ll want much more error checking, I’ve removed them for this example),

public partial class _Default : System.Web.UI.Page {
        
    // Manage account information
    CloudStorageAccount storageAccount = null;

    // Runtime data context
    TableServiceContext tableServiceContext = null;

    protected void Page_Load(object sender, EventArgs e) {
        // Init the contexts
        this.storageAccount = CloudStorageAccount.FromConfigurationSetting("DataConnectionString");
        this.tableServiceContext = new TableServiceContext(storageAccount.TableEndpoint.ToString(), storageAccount.Credentials);

        // Hook up the buttons
        this.Button1.Click += new EventHandler(CreateTableClick);
        this.Button2.Click += new EventHandler(InsertTableClick);
        this.Button3.Click += new EventHandler(DeleteTableClick);
    }

    // Create a table
    private void CreateTableClick(Object sender, EventArgs e) {
        // Create an Azure table
        storageAccount.CreateCloudTableClient().CreateTableIfNotExist(tablenameBox.Text);

        // Update the display
        this.ListBox1.Items.Clear();
        foreach (string tableName in this.storageAccount.CreateCloudTableClient().ListTables()) { 
            this.ListBox1.Items.Add(tableName); 
        }
    }

    // Insert into a table
    private void InsertTableClick(Object sender, EventArgs e) {
        // Insert into an Azure table
        this.tableServiceContext.AddObject(this.ListBox1.SelectedItem.Text, new MyTableRow() { Name = rowName.Text, Age = Int32.Parse(rowAge.Text) });
        this.tableServiceContext.SaveChanges();

        // Update the display
        ArrayList values = new ArrayList();
        foreach (MyTableRow tableRow in this.ViewTableDetails(this.ListBox1.SelectedItem.Text)) { 
            values.Add(tableRow); 
        }
        this.Repeater1.DataSource = values;
        this.Repeater1.DataBind();
    }

    // Get rows from a table
    public IEnumerable<MyTableRow> ViewTableDetails(string tableName) {
        var results = from c in this.tableServiceContext.CreateQuery<MyTableRow>(tableName) select c;

        var query = results.AsTableServiceQuery<MyTableRow>();
        var queryResults = query.Execute();
        return queryResults;
    }

    // Delete a table
    private void DeleteTableClick(object sender, EventArgs e) {
        // Delete a table from Azure
        this.storageAccount.CreateCloudTableClient().DeleteTableIfExist(this.ListBox1.SelectedItem.Text);

        // Update the display
        this.ListBox1.Items.Clear();
        foreach (string tableName in this.storageAccount.CreateCloudTableClient().ListTables()) { 
            this.ListBox1.Items.Add(tableName); 
        }
    }
}

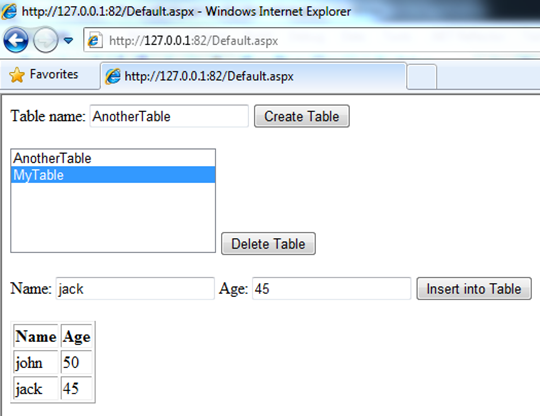
8. Now you can run the application,

image 


Azure Simplified Part 1: Getting started with Windows Azure

To get started with Windows Azure,

1. Get the Azure tools for Visual Studio 2008 and Visual Studio 2010 here.

2. To configure you machine for Azure, make sure you follow the instructions on the same page.

3. Installing it should give you these in the StartMenu,

image

4. Open up Visual Studio 2008 (run as Administrator) and create a new ‘Cloud Service’ project,

image

If you don’t run Visual Studio as admin, you’ll get this,

image

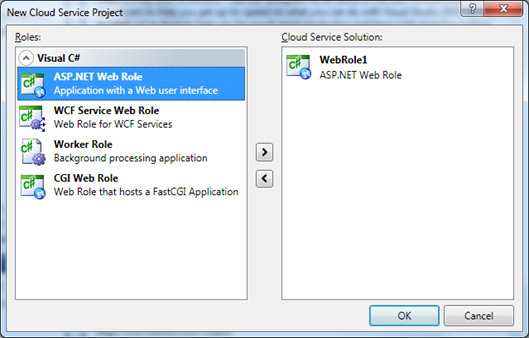
5. Next, create a ASP.NET Web Role,

image

(I’ll discuss the different roles in another post.)

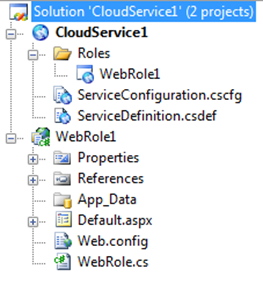
6. In your Solution Explorer, you should see now,

image

7. Open the Default.aspx and add “Hello Azure!” inside the div element,

<body>
    <form id="form1" runat="server">
        <div>"Hello Azure!"</div>
    </form>
</body>

8. Press F5 to run the application, you should see on first run,

image

9. And, if all goes well, you should see,

image

Azure Simplified Series

In this series, I’ll take a look at some of the major concepts of Windows Azure. Azure is Microsoft’s big bet on the cloud. The Azure platform allows developers to create applications and services that can reside on the cloud. The central idea is that you can run your applications (and manage your data) from a data center (hosted by Microsoft), as opposed to a desktop (or your own production servers). Windows Azure provides the infrastructure needed to build, manage, store, deploy, and run applications on servers in Microsoft data centers.

Azure Simplified Part 1: Getting Started with Windows Azure

Azure Simplified Part 2: Using Azure Tables

Azure Simplified Part 3: Using Azure Blob Storage

Azure Simplified Part 4: Using Azure Queue Storage

Azure Simplified Part 5: Using REST API for Azure Queue Storage